
The sun is shining, the weather is hot, and families are gathering together for fun parties, days at the pool, special events, trips to the beach, and cookouts…summer is finally here. July is National Picnic Month – this is the perfect time to be with your friends and family for an outdoor afternoon getaway. Preparing delicious meals to pack and enjoy in advance is not difficult, and food can be kept simple and healthy, such as sandwiches, veggies and dip, meat, cheese, and fruit salad.
Hello, my name is Sara, and in this blog, I will teach you (with detailed directions and photos) how to prepare and then build a beautiful and delicious summer platter using Basmati rice, roasted vegetables, and zesty Italian chicken. The contents of the platter can be portioned out into a smaller container, kept cold and packed away for a picnic, or even filled up into whole wheat pita bread for delicious sandwiches and/or wraps (in honor of National Sandwich Month, which is in August). I will also provide a link to my blog post from June 2022, where I detail how to build a delicious Mediterranean warm grain bowl and feature additional photos of inspiring summer meals for breakfast, lunch, and dinner. Lastly, I will provide an extensive list of additional resources from our CCPL catalog, detailing how to build the perfect platters and boards and healthy summer cooking.
Part I: Zesty Italian Chicken Platter with Roasted Vegetables over Basmati Rice (Ingredients):
 This is the specific platter I chose to build (with ingredients that I enjoy, but you can build whatever you desire…there are countless flavor combinations.) This particular platter is a perfectly balanced, healthy meal of equal parts starch, vegetables, and protein. Below is a list of ingredients for each of the components – of course, if you have specific food allergies – such as a nut allergy – omit those ingredients. Check out these helpful books: Platters and Boards: Beautiful, Casual Spreads for Every Occasion by Shelly Westerhausen with Wyatt Worce, and The Art of the Board: Fun & Fancy Snack Boards, Recipes & Ideas For Entertaining All Year by Olivia Carney (each book is also linked below in the extensive list of additional resources from our CCPL catalog). Here are all of the specific supplies and ingredients – listed under the 3 main components I used (Basmati rice, roasted vegetables, Zesty Italian chicken):
NOTE: For a vegan-friendly platter – omit the chicken and choose another protein option, such as tofu.
NOTE: For those who love meat (and want additional protein ideas) – you may also include various types of meat, such as rotisserie chicken, grilled or blackened chicken, shrimp, fish, steak, pork, bacon, etc.
Part II: Preparing the Platter (Directions):
This was my first attempt at a summer platter, and although a bit time-consuming, it was surprisingly easy…this is definitely something an entire family can participate in. Summer is the perfect time for families to gather together and prepare their favorites, and teens and even younger children will benefit by being involved, as it is never too early to pass along cherished recipes while teaching your family the importance of healthy nutrition and kitchen safety. Check out these helpful books: The Complete Cookbook for Teen Chefs: 70+ Teen-Tested and Teen-Approved Recipes to Cook, Eat and Share by America’s Test Kitchen and Kids Can Cook Anything!: The Complete How-To Cookbook for Young Chefs, With 70+ Kid-Tested, Kid-Approved Recipes by America’s Test Kitchen.
I decided to build a large platter – enough for 3 or 4 servings (or even leftovers, as this will keep well in the refrigerator for up to 2 days, and it actually tastes even better reheated the next day if kept dry and stored with no dressings). Below are specific directions for the three main components: Basmati rice, roasted vegetables, and zesty Italian chicken.
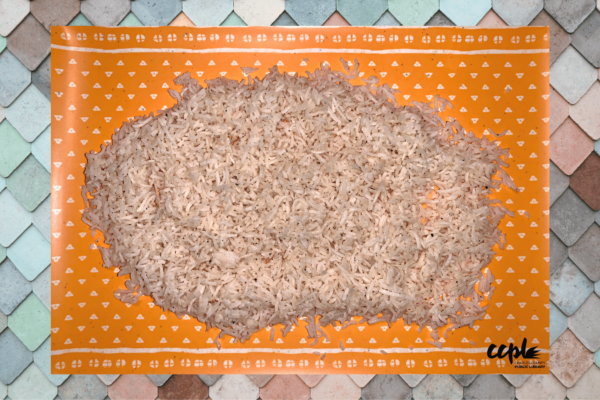
For the “starch” component of this platter, you may use any rice you desire (but I decided to use Basmati rice, because I really enjoy its trademark earthy, nutty flavor). The specific brand I use (“Daawat”) is linked in this blog. If you also like Basmati rice and want to know how I prepared it, here are simple microwave directions:
- TIP: In the microwave, I put extra paper towels under the glass bowl while cooking, or fold up a paper grocery bag and place a couple of paper towels on top of the paper bag (and then the glass bowl) and cook it that way. This is because the rice water tends to bubble up, and a little squeezes out from under the cover. This saves you from cleaning up a big mess.
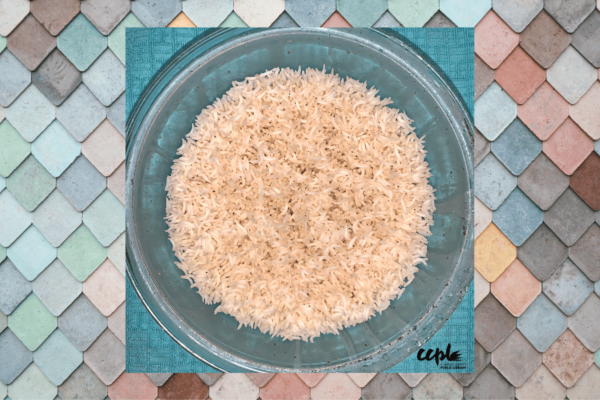
First, pour 1 cup of Basmati rice into a colander and thoroughly rinse it under cold running water to remove the extra starch. Sprinkle salt and pepper into a large glass (microwaveable) bowl to taste. Then add 2 cups of water (for every 1 cup of rice). Add 1 Tbsp of olive oil and the rinsed rice, and let the entire mixture sit for 15 minutes.

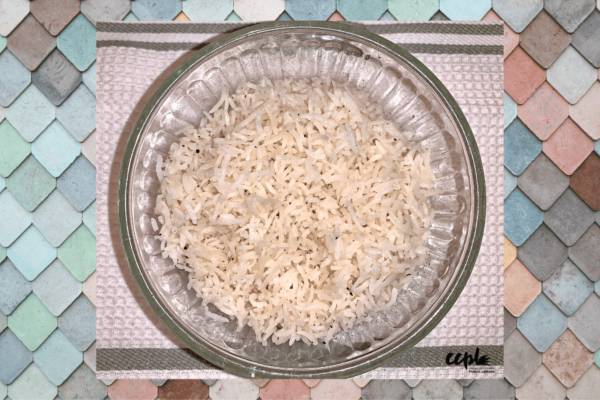
Whisk together and microwave, covered, on full power (#10) for 8 minutes. Then microwave, covered, on low power (#3) for another 8 minutes. Uncover and cool for about 20-30 minutes. The rice comes out perfect every single time. *This makes enough for 4 servings.
Once the rice is completely cool, depending on how large you want your platter, consider setting aside a smaller portion for the platter (or for a different meal) in a separate bowl – as shown here. You may cover it with plastic wrap while you move on to preparing the other two components.
For the “vegetable” component of this platter, you may use any vegetables you desire (but I decided to use Brussels sprouts and Sunset Wild Wonders tomatoes because I think they complement each other nicely and taste delicious when roasted). Not everyone likes Brussels sprouts (and/or tomatoes), so if you are not a fan, feel free to use a different combination of vegetables for your baking sheet. However, if you like Brussels sprouts and tomatoes and want to know how I prepared them, here are simple directions:
- TIP: Preheat your oven to between 430-450, as these particular vegetables will roast for about 35 minutes (or until brown and crispy).
I began with the Brussels sprouts. I prefer to choose my own at the local grocery store and like to hand-pick between 10-15 medium to large-sized sprouts. You may also purchase pre-packaged sprouts, either at the store or similar to the brand linked above, on Amazon. I began by peeling off the outer few layers of each sprout (just a few leaves on each sprout) because of the fact they were picked up and handled so much at the store as well as some of the outer leaves had begun to turn a little brown. Throw the outer leaves in the trash. After peeling each spout, I put them into a large colander so that they could all be thoroughly washed under cold running water.
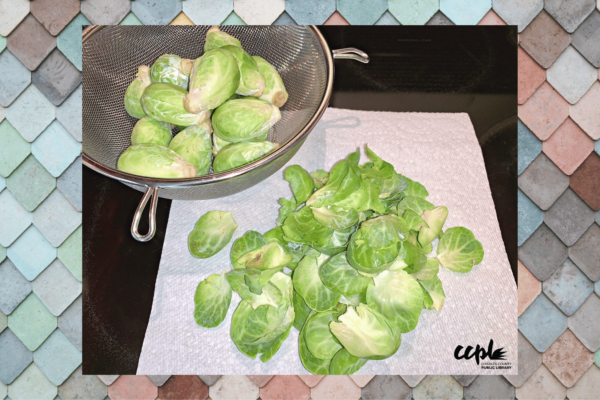
Once the sprouts were washed, I gently patted them dry and began trimming them on a cutting board. Using a sharp kitchen knife, I cut off the bottom ‘stem’ portion of each sprout and then cut them in half (and eventually in quarters). The smaller the sprouts, the more tender and flavorful they are when roasted.

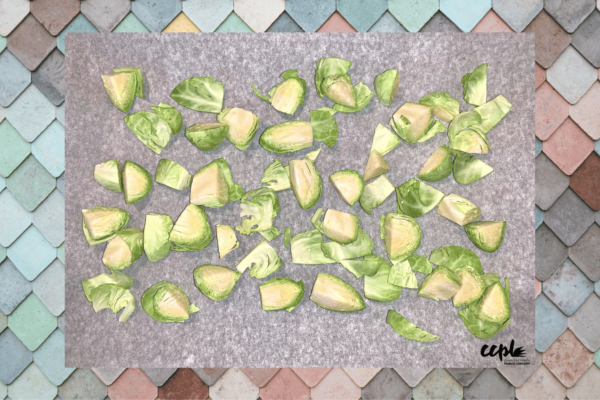
Once all of the sprouts were trimmed and sliced, I lined a 13 X 9 baking sheet with parchment paper and sprinkled my sprouts onto the entire sheet – evenly spreading them out.
Next, I put the tomatoes (linked above) into a large colander so that they could all be thoroughly washed under cold running water. I gently patted them dry and began cutting them on a cutting board. Using a sharp kitchen knife, I cut each tomato in half.
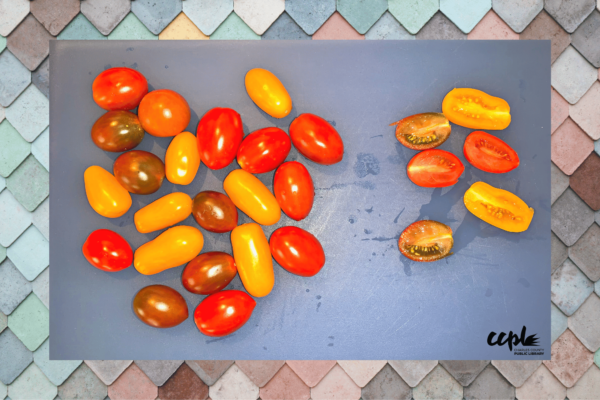
Once all of the tomatoes were sliced, I sprinkled them onto the entire lined baking sheet – evenly spreading them out, along with the sprouts.
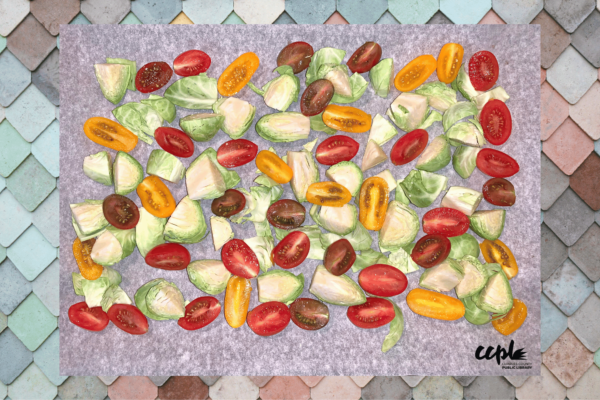
Then I added additional vegetables to the baking sheet – diced red onion, yellow, red and green peppers (also diced), green, unsalted “pepita” pumpkin seeds, and sliced almonds. For convenience, you may also purchase pre-diced onion and pepper pieces and just keep them frozen (this is what I did). Lightly drizzle everything with olive oil and then sprinkle sea salt (or regular salt) and ground black pepper, to taste.
Your oven should already have been preheated to between 430-450 degrees Fahrenheit (I set my oven to 450 degrees and let them roast for 35 minutes). This is important – at about the halfway point, open the oven and take out the baking sheet, and use a fork to give all of the vegetables a quick toss/rotation so that they may become evenly browned and roasted. Return the vegetables to the oven for the remainder of the time.
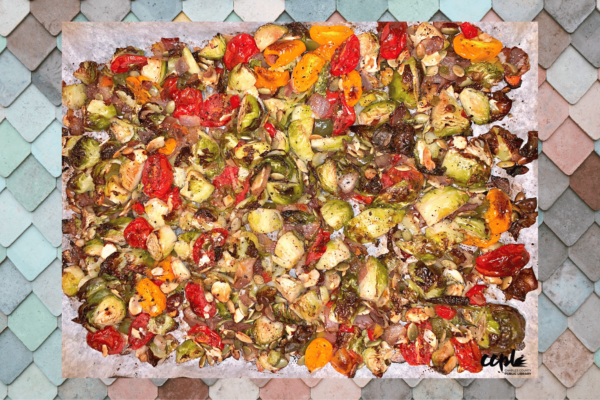
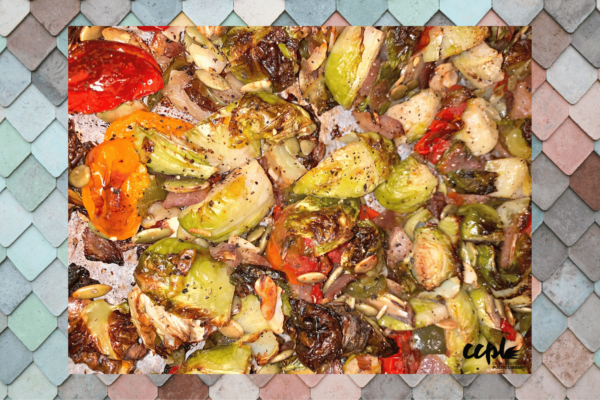
Continue to keep a close eye on the vegetables while they are in the oven, they may even be ready to come out before 35 minutes. If they look or smell like they are burning, turn down the heat or take them out. Here is a detailed view of the vegetables – they are perfectly golden brown and crispy (and the tomatoes are so tender)
Once the roasted vegetables are cool, depending on how large you want your platter, consider setting aside a smaller portion for the platter (or even for a different meal). You may scoop some into a separate bowl and cover it with plastic wrap, as shown here, while you move on to preparing the final component.
For the “protein” component of this platter, you may use any meat (or tofu, if you are vegan) you desire. I decided to use chicken because I like the taste, and I prefer chicken. If you also like chicken and want to know how I prepared it, here are simple directions:
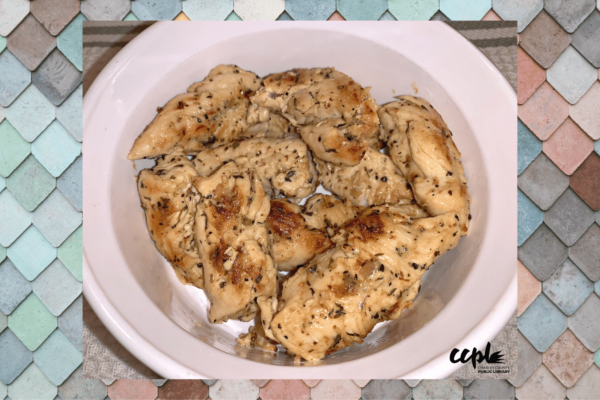
I purchased a package of approximately 10 chicken tenders, rinsed them, and put the pieces on a cutting board. I used a sharp kitchen knife to cut and ”tease” the tendons out of each piece (I held the tendon between my thumb and finger, and dragged the knife along the tendon, scraping the meat away) . Then I cut the tenders in half, put them in a large glass bowl and covered them with Kraft Zesty Italian dressing and ground black pepper (using about half the bottle of dressing or until the pieces were completely covered). I placed the bowl in the refrigerator for an hour, allowing the chicken to marinate. If you don’t have an hour, let them marinate for at least 15 minutes. I preheated the olive oil in a large non-stick frying pan on medium to medium high heat (and covered the bottom of the pan with oil). I fried the marinated chicken tenders for a few minutes on each side until there were some browned areas on the chicken, and it felt somewhat solid to the touch (I poured the extra Italian dressing into the frying pan, for flavor). I transferred the chicken tenders to a separate bowl, to cool.
- TIP: Be sure not to crowd the chicken in the pan, so it fries (and does not stew).
Part III: Building the Platter (Directions):
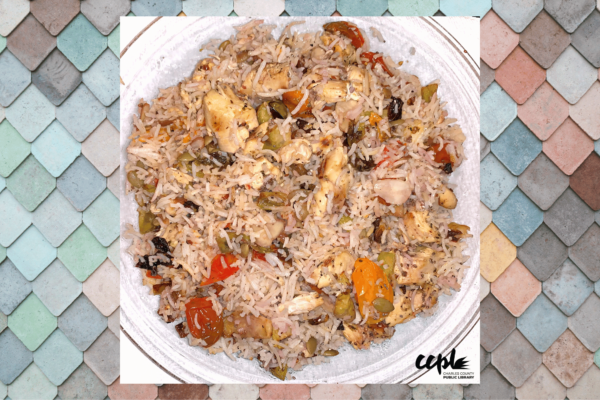
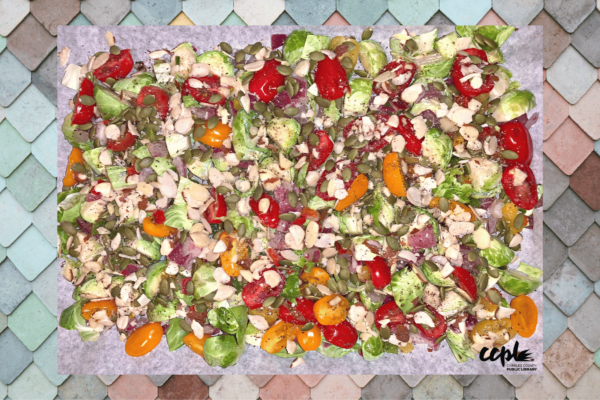
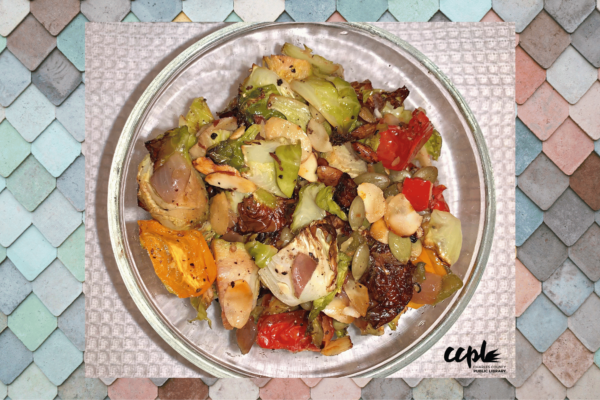
Below is how I chose to “build” and plate my summer platter (you may choose to plate it differently). Keep in mind that this is a rather large portion, enough for about 3 or 4 people. Everyone can serve themselves from the platter and scoop what they want into an individual bowl or plate, and mix everything together (as seen in the photo at the beginning of this blog).
DISCLAIMER: The following photos are for the purpose of presentation while at home, but naturally this food can also be packed away and kept cool for easy transportation if going on a day trip, or a picnic. If needed, briefly reheat the components prior to building and presenting the platter.
OPTIONAL: Consider garnishing the small portion you plan to eat with a dressing such as a creamy raspberry or a Balsamic vinaigrette. If desired, you may also add chunks of fresh avocado for extra creaminess – again, only to the portion you plan to eat. Avocado tastes best when eaten freshly sliced.
- TIP: Click here for great tips (and photos) on how to safely cut and peel a ripe avocado.
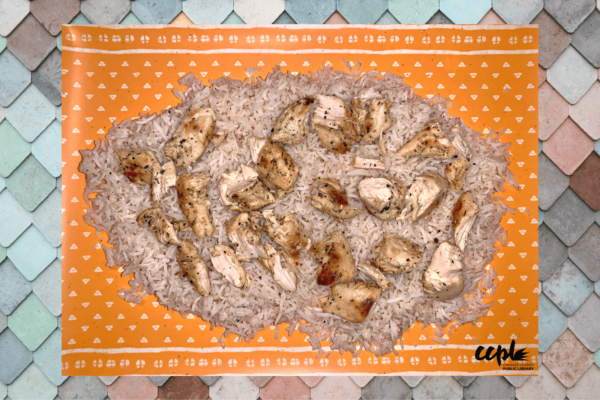
Choose a large serving bowl, plate or platter (I chose a vibrant marigold-colored platter because it reminded me of a warm summer day). I began by spreading out the Basmati rice into a large pile.
Then I added my Zesty Italian chicken tenders (I used a sharp kitchen knife to cut them into even smaller chunks) and I spread them out over the Basmati rice.
Next I added the roasted vegetables, and incorporated them evenly around the Zesty Italian chicken tenders.
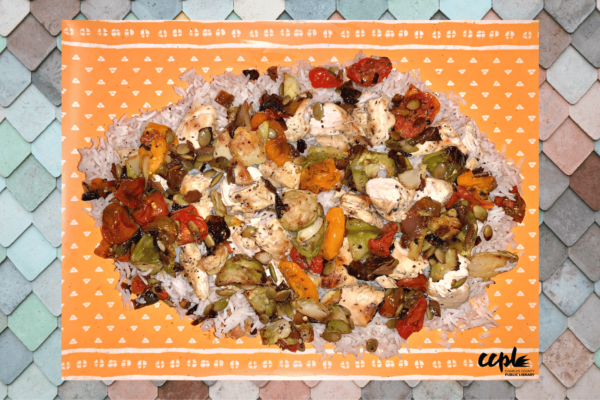
Lastly, I added sliced almonds and chia seeds (both optional) for some extra crunch. The platter can be portioned out into a smaller container, kept cold and packed away for a picnic or even filled up into whole wheat pita bread for delicious sandwiches and/or wraps.

Part IV: Building a Mediterranean Warm Grain Bowl:
Below is my very own past summer blog post courtesy of our CCPL @ HOME BLOG. This is a very beneficial blog which, in addition to teaching you how to build a gorgeous Mediterranean bowl, also provides additional summer meal inspirations, invaluable gardening tips and a link to local markets and farm stands for fresh produce available via an online directory courtesy of Southern Maryland Agricultural Development Commission (SMADC).
- NOTE: To access my blog post in its entirety, please click on the blog title (below).
National Fresh Fruit and Vegetable Month (with Healthy Meal Inspirations)
(June 2022)
“In this blog, I will teach you how to build a beautiful and delicious Mediterranean warm grain bowl using fresh fruits and vegetables and dark leafy greens. I will also provide my own photos of healthy meal inspirations for breakfast, lunch and dinner. Then I will outline tips and tricks (courtesy of my friend, Andrea) for effective gardening. Lastly, I will provide a link to resources for fresh local produce available at various Southern Maryland farmer’s markets, farm stands and CSAs (Community Supported Agriculture).”
Here is a detailed view of the finished (gorgeous) Mediterranean warm grain bowl.

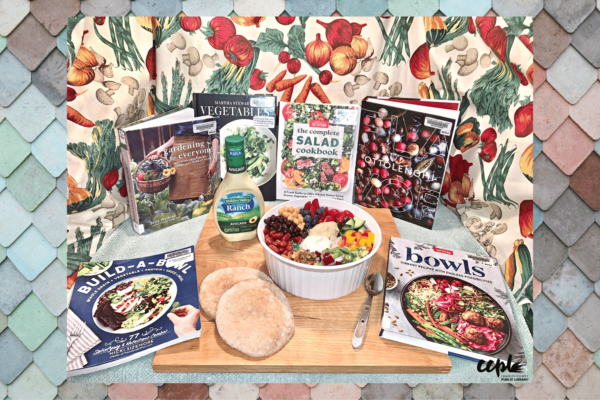
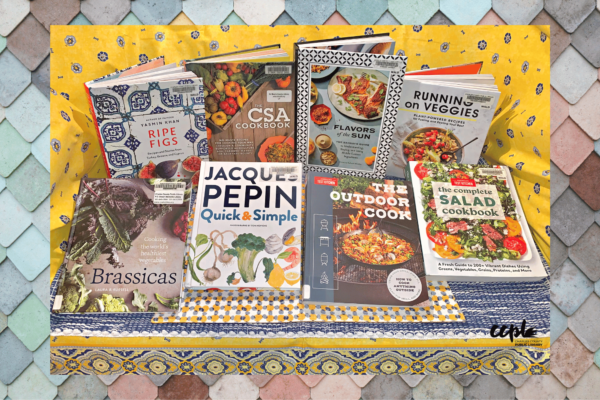
Part V: Additional Resources:
You may also check out our CCPL catalog for more information on building the perfect platters and boards and recipes for delicious and healthy summer meals such as:
- Sea Salt and Honey: Celebrating the Food of Kardamili in 100 Sun-Drenched Recipes: A New Greek Cookbook by Chloe, Olivia and Nicholas Tsakiris
- Milk Street Vegetables: 250 Bold, Simple Recipes for Every Season by Christopher Kimball
- The Summer Table: Recipes and Menus for Casual Outdoor Entertaining by Lisa Lemke
- The Mediterranean Dish: 120 + Bold and Healthy Recipes You’ll Make on Repeat by Suzy Karadsheh with Susan Puckett
- Art of the Chicken: A Master Chef’s Paintings, Stories, and Recipes of the Humble Bird by Jacques Pépin
- Ripe Figs: Recipes and Stories from Turkey, Greece and Cyprus by Yasmin Khan
- The CSA Cookbook: No-Waste Recipes for Cooking Your Way Through a Community
- Supported Agriculture Box, Farmers’ Market or Backyard Bounty by Linda Ly
- Flavors of the Sun: The Sahadi’s Guide to Understanding, Buying and Using Middle Eastern Ingredients by Christine Sahadi Whelan
- Running on Veggies: Plant-Powered Recipes for Fueling and Feeling Your Best by Lottie Bildirici
- Brassicas: Cooking the World’s Healthiest Vegetables: Kale, Cauliflower, Broccoli, Brussels Sprouts and More by Laura B. Russell
- Quick & Simple: Simply Wonderful Meals with Surprisingly Little Effort by Jacques Pépin
- The Outdoor Cook: How to Cook Anything Outside Using Your Grill, Fire Pit, Flat-Top Grill and More by America’s Test Kitchen
- The Complete Salad Cookbook: A Fresh Guide to 200+ Vibrant Dishes Using Greens, Vegetables, Grains, Proteins and More by America’s Test Kitchen
- Platters and Boards: Beautiful, Casual Spreads for Every Occasion by Shelly Westerhausen with Wyatt Worcel
- Kids Can Cook Anything!: The Complete How-To Cookbook for Young Chefs, With 70+ Kid-Tested, Kid-Approved Recipes by America’s Test Kitchen
- The Love & Lemons Cookbook: An Apple-to-Zucchini Celebration of Impromptu Cooking by Jeanine Donofrio
- Foolproof Fish: Modern Recipes for Everyone, Everywhere by America’s Test Kitchen
- Downshiftology Healthy Meal Prep: 100+ Make Ahead Recipes and Quick-Assembly Meals: A Gluten-Free Cookbook by Lisa Bryan
- Lemon, Love & Olive Oil by Mina Stone
- The Complete Summer Cookbook: Beat the Heat With 500 Recipes That Make the Most of Summer’s Bounty by America’s Test Kitchen
- Love & Lemons Every Day: More Than 100 Bright, Plant-Forward Recipes for Every Meal by Jeanine Donfrio
- The Complete Cookbook for Teen Chefs: 70+ Teen-Tested and Teen-Approved Recipes to Cook, Eat and Share by America’s Test Kitchen
- Project Smoke: Seven Steps to Smoked Food Nirvana, Plus 100 Irresistible Recipes from Classic (Slam-Dunk Brisket) to Adventurous (Smoke Bacon-Bourbon Apple Crisp) by Steven Raichlen
- The Art of the Board: Fun & Fancy Snack Boards, Recipes & Ideas For Entertaining All Year by Olivia Carney
Image credits:
Unless otherwise noted and/or linked, all images were shot during the making of this blog.


