It is officially winter, the foliage is crisp, and the tree branches are bare…the days are much shorter, and there is a chill in the air.
With the festive season fast approaching, this is the perfect time of year for families and friends to gather together to visit each other, celebrate fun activities, and cook and bake their favorites.
Teens and even younger children will benefit by being involved, as it is never too early to pass along cherished recipes while teaching them the importance of nutrition and kitchen safety.
Hello, my name is Sara, and in this blog, I will provide four winter meal recipes and inspirations (some are my own photos) with specific ingredients and directions. I will also provide a link to creating lovely seasonal decor for winter, as well as beautiful winter craft inspirations.
Winter Meal Recipes and Inspirations:
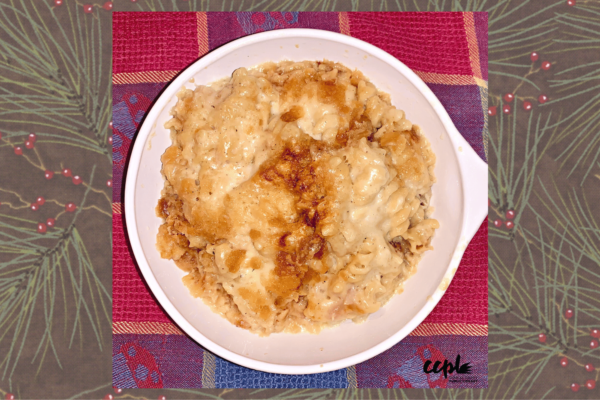
First is my favorite recipe for homemade “Macaroni and Cheese,” courtesy of the 1978 Betty Crocker cookbook (below are the original ingredients and directions). Also, check out this helpful book: The Mac + Cheese Cookbook: 50 Simple Recipes from Homeroom, America’s Favorite Mac and Cheese Restaurant by Allison Arevalo and Erin Wade (which is linked below in the extensive list of additional resources from our CCPL catalog).
Here are my specific modifications:
*For the macaroni component, I prefer using whole-grain rotini pasta (this brand) because it is healthier and high in fiber.
- NOTE: I use red onions (soften in the butter for about 5 minutes). I heat up the milk for about a minute in the microwave (pour into a 2-cup Pyrex measuring cup to the 1 ¾ line). For the cheese, I like to use Land O’ Lakes White American Cheese (½ lb. sliced). I use ½ a sleeve of Carr’s original table water crackers, crushed, for the topping. Dotted with approximately 2 Tablespoons of butter. Bake uncovered.
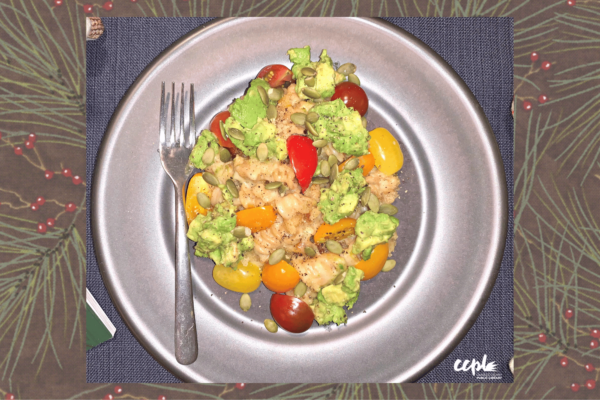
Once out of the oven and cool enough to serve, I prefer to top it with sliced grape tomatoes, fresh avocado, green unsalted “pepita” pumpkin seeds, ground black pepper, and sprinkled with Panko breadcrumbs (for extra crunch).
- SARA’S TIP: If desired (as pictured above), you may add chunks of fresh avocado for extra creaminess. Only add to the portion you plan to eat because I think avocado tastes best when freshly sliced. I slice avocado chunks into a bowl and mash them along with ground black pepper, sea salt, and freshly squeezed lemon juice. Then I add it to the warm macaroni and cheese. Click here for great tips (and photos) on how to safely cut and peel a ripe avocado.
Ingredients:
- 1 to 1½ cups uncooked elbow macaroni, rigatoni, or spinach egg noodles (about 6 ounces)
- ¼ cup margarine or butter
- 1 small onion, chopped (about ¼ cup)
- ½ teaspoon salt
- ¼ teaspoon pepper
- ¼ cup all-purpose flour
- 1¾ cups milk
- 8 ounces processed sharp American or Swiss cheese, processed American cheese loaf or processed cheese spread loaf, cut into ½-inch cubes
- Crunchy topping – crushed Ritz crackers, Triscuits, Carr’s original table water crackers, Panko bread crumbs, etc. (optional)
Directions:
- Cook macaroni to the desired texture – I prefer for it to be “al dente” (firm). Preheat the oven to 375 degrees. Cook and stir margarine, onion, salt, and pepper over medium heat until onion is slightly tender. Blend in flour.
- Cook over low heat, stirring constantly, until mixture is smooth and bubbly; remove from heat.
- Stir in milk. Heat to boiling, stirring constantly. Boil and stir for 1 minute; remove from heat.
- Stir in cheese until melted, and place macaroni in an ungreased 1½-quart casserole.
- Add a crunchy topping if desired. Cook uncovered for 30 minutes.
Yields 5 servings.
NOTE: Below are a few additional variations for enjoying this recipe…
Here, I have garnished the macaroni and cheese with sliced grape tomatoes, fresh red onions, and chia seeds (for extra crunch).
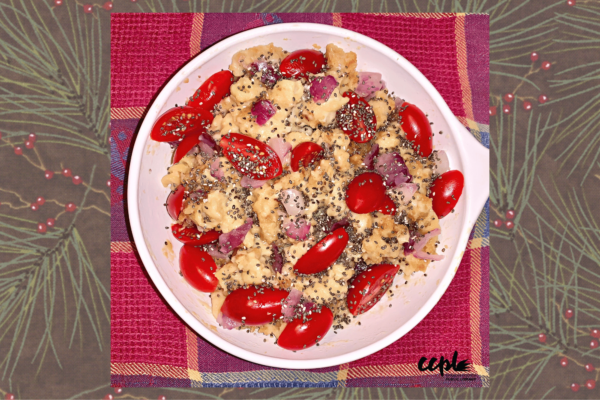
Here, I have left the macaroni and cheese plain (with just crushed Ritz crackers on top and a little bit of ground black pepper).
Second is one of my favorite muffin recipes, “Kellogg’s All-Bran Muffins” (these are perfect to pair with your favorite hot beverage). They are hearty, delicious and super healthy – given the amount of fiber in each muffin.
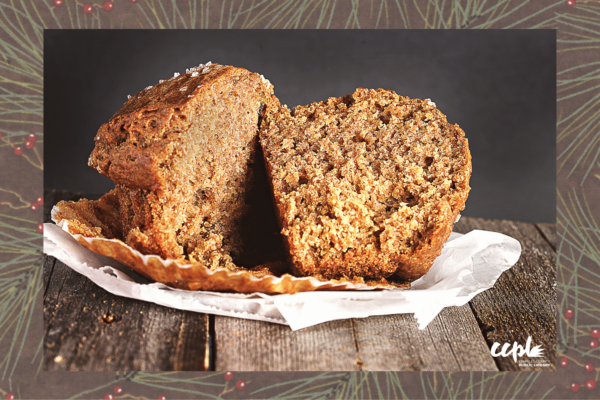
(From www.kelloggs.com): Try the treat that started it all! Thanks to two full cups of All-Bran® cereal per recipe, each of these yummy muffins offers 14% of your fiber DRV (daily recommended value). These are truly a delicious and nutritious snack for any time of day.
Prep Time: 20 min
Total Time: 50 min
*All-Bran muffin image courtesy of Canva
Ingredients:
- 1 ¼ cups all-purpose flour
- ½ cup sugar
- 1 Tbsp baking powder
- ¼ tsp salt
- 2 cups Kellogg’s® All-Bran® Original cereal
- 1 ¼ cups fat-free milk
- ¼ cup vegetable oil
- 1 egg
- Granulated sugar/sliced almonds (optional)
Directions:
- Stir together flour, sugar, baking powder, and salt. Set aside.
- In a large mixing bowl, combine Kellogg’s ALL-BRAN cereal and milk. Let stand for about 2 minutes or until cereal softens. Add egg and oil. Beat well. Add flour mixture, stirring only until combined. Portion evenly into twelve 2 1/2- inch muffin pan cups coated with cooking spray.
- Consider sprinkling a crunchy topping on each muffin, such as granulated sugar or sliced almonds (optional).
- Bake at 400 degrees for about 20 minutes or until golden brown. Cool for 10 minutes. Serve warm.
Yields 12 muffins
VARIATION # 1: For muffins with reduced calories, fat, and cholesterol: Use 2 tablespoons sugar, 2 tablespoons oil, and substitute 2 egg whites for 1 egg.
VARIATION # 2: For muffins with reduced fat and cholesterol: Substitute 2 egg whites for 1 egg and ¼ cup sweetened applesauce (or 2 oz. jar bananas baby food) for ¼ cup vegetable oil (muffin texture may vary slightly from The Original All-Bran Muffins recipe).
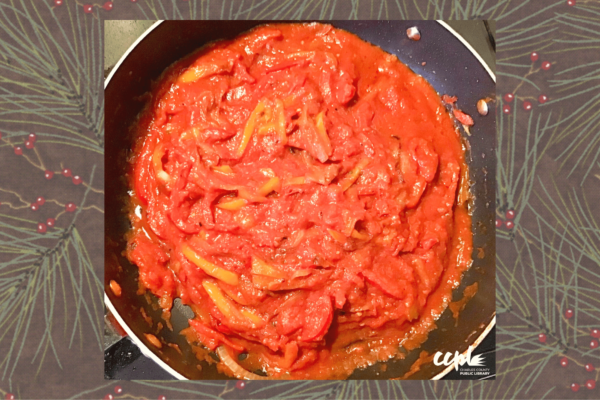
Third is my favorite way to indulge in pasta, “Whole Grain Linguine with Peppers and Onions in Vodka Sauce.”
Here are specific ingredients and directions for the pasta (and sauce):
*I prefer using whole-grain linguine pasta (this brand) because it is healthier and high in fiber.
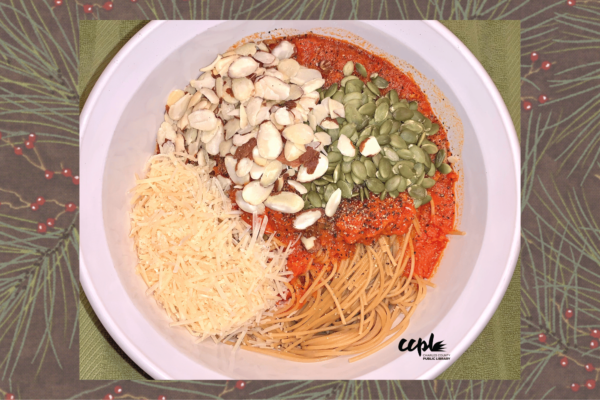
Ingredients:
- Barilla whole grain linguine
- RAO Vodka Sauce (or your favorite jarred tomato sauce)
- Red, green, and/or yellow peppers
- Red onions
- Ground black pepper
- Freshly grated or shaved Parmesan cheese
- Olive oil
- Green, unsalted “pepita” pumpkin seeds (optional)
- Sliced almonds (optional)
- Chia seeds (optional)
Directions:
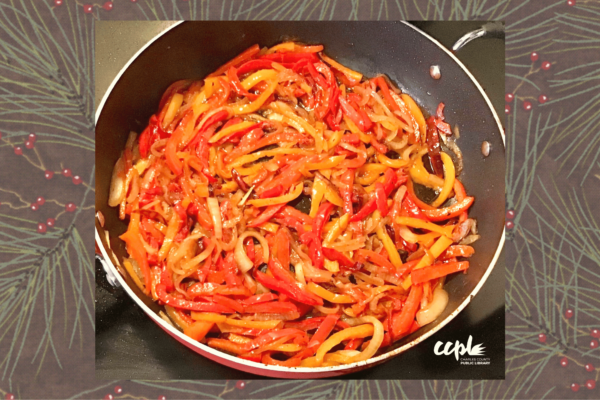
For pasta lovers, I love the brand RAO – my favorite flavor of their tomato sauce is the Vodka Sauce. I love this brand for a quick and easy meal if you are too tired or do not have time to make your own homemade sauce (or “gravy,” as my family refers to it).
You can easily enhance this sauce by sautéing peppers with onions in olive oil and then mixing in the tomato sauce of your choice. You can make your own sauce – but I do love to use this brand. I find that it tastes very authentic and homemade. Once you’ve finished making your sauce, store any extra in a Tupperware container in the refrigerator (it will keep for several days).
Cook the pasta to a desired texture – I prefer for it to be “al dente” (firm). Drain thoroughly and pour into a large dish. You can add this sauce to cooked pastas such as fettuccine, linguine, and penne. Garnish your meal with crunchy toppings such as “pepita” pumpkin seeds, sliced almonds, and/or chia seeds (optional) and freshly grated or shaved Parmesan cheese.
Fourth was my good friend Jean’s favorite recipe for “Homemade Shortbread Cookies.” This is her own recipe (in her own words), and these were her favorite cookies to bake and share with her family and friends during the festive season.
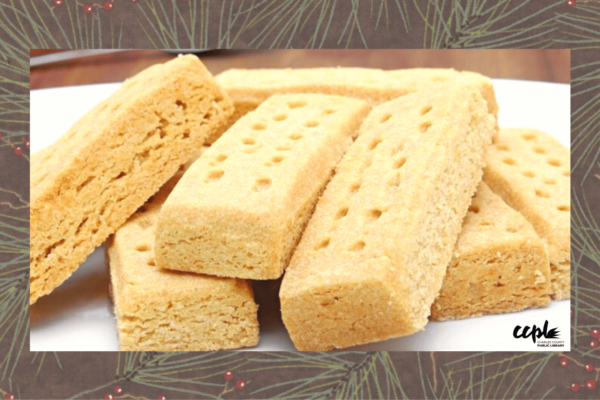
Baking Times: Preheat oven to 325 degrees (bake for 20 minutes)
Lower oven to 300 degrees (bake for an additional 10-15 minutes)
Lower oven to 275 degrees (bake for a final 10 – 15 minutes – until lightly brown)
Total cooking time: 45 – 55 minutes (refer to Jean’s Ingredient Notes below for more details on cooking times).
Pan Size: 13 x 18 jelly roll pan
*Shortbread cookie image courtesy of: https://www.biscuitpeople.com/magazine/post/shortbread
Ingredients:
- 3 sticks Land O’ Lakes salted butter (1 ½ cups butter – NEVER use margarine)
- ⅔ cup sugar
- 1 Tbsp pure vanilla
- 1 Tbsp vanilla paste (if desired)
- 4 cups flour
*Please refer to Jean’s Ingredient Notes at the end of this recipe*
Directions:
- Cream together sugar and butter until smooth and light. Add 1 T vanilla and 1 T vanilla paste (if using) – cream until incorporated. Add flour a little at a time until all is incorporated – mix until smooth.
- Spread into a 13 x 18 jelly roll pan until smooth on top. (I use a metal spatula to do this.) Dip cookie stamp into sugar and imprint dough beginning in the corner, working across or down. Dip the stamp into sugar each time you use it. After you have stamped all the cookies, lightly sprinkle a little sugar on top of the cookies, then turn over the pan and shake off excess.
- Bake at 325 degrees for 20 minutes. Turn the pan, lower the temperature to 300 degrees, and bake for an additional 15 – 20 minutes until it is very lightly brown. Lower the temperature to 275 degrees and bake for a final 10 – 15 minutes until it is lightly brown.
- Remove cookies from the oven and immediately cut cookies into squares while still hot. Remove squares from the pan, and cool on the rack. When cool, pack into an airtight container.
JEAN’S INGREDIENT NOTES (things I have learned about baking these cookies):
The jelly roll pan is measured on the top, side to side. Some people use a smaller pan; however, it makes a thicker cookie, and I prefer one that is not that thick. It’s a matter of preference. However, for this recipe, using this size pan – these are the things that I do. Cooking times will be different if using a smaller pan.
I use ⅔ cup sugar because I very lightly sprinkle a little sugar on top of the cookies just before baking them, then turn the pan upside down and wrap it slightly on the counter to remove any extra sugar – this seems to make them just sweet enough. Again, it’s a matter of taste and preference.
After 20 minutes of baking, I turn my pan around because I have a small wall oven, and they tend to bake more evenly when the pan is turned. It might not be necessary in a bigger oven.
Halfway through, I turn the oven down to 300 degrees to bake for an additional 15 – 20 minutes and then turn the oven down again to 275 degrees for the last 10 – 15 minutes. Play with it, and see what you like. Turning down the oven and baking for a little
longer seems to make the cookies crisp throughout. If you don’t like for them to be as crisp, bake them for a little less time.
NOTE: There is a fine line between over-cooked butter cookies and very lightly browned cookies. All of a sudden, you can have a cookie that tastes “overcooked” instead of just right. Watch them carefully at the end. If you prefer a more “cake-like” cookie, cook them at a higher temperature and remove them from the oven for 30 – 35 minutes.
Ingredient Notes (this is what I use to make these cookies):
- 3 sticks butter (1 ½ cups butter – NEVER use margarine) – Land O’ Lakes salted
- 2/3 cup sugar
- 1 T pure vanilla (I only use Nielsen-Massey Vanilla – found on the King Arthur website or at Williams Sonoma)
- 1 T vanilla paste – this is optional, you do not have to use this, but I use the Nielsen-Massey Vanilla Paste – when I do add this, I also add the 1 T pure vanilla
- 4 cups flour (I use King Arthur unbleached all-purpose flour)
Additional Resources:
For more inspiring recipe ideas, please visit CCPL’s new free culinary database, The Culinary Arts Collection. The Culinary Arts Collection offers a smorgasbord of information—more than five million articles from more than 250 major cooking and nutrition magazines, as well as book reference content from Delmar such as About Wine, Introduction to Catering, Advanced Bread and Pastry, and Eat Fit Be Fit. Exclusive features, including Topic Finder, InterLink, and a mobile-optimized interface, support and enhance the search experience.
Below are articles providing links to creating lovely seasonal decor for winter, as well as beautiful winter craft inspirations:
- 42 Winter Decor Ideas to Keep You Cozy Until Spring
- 41 Fun Winter Crafts for Adults
- The Ultimate List of 65+ Winter Arts and Crafts for Kids of All Ages
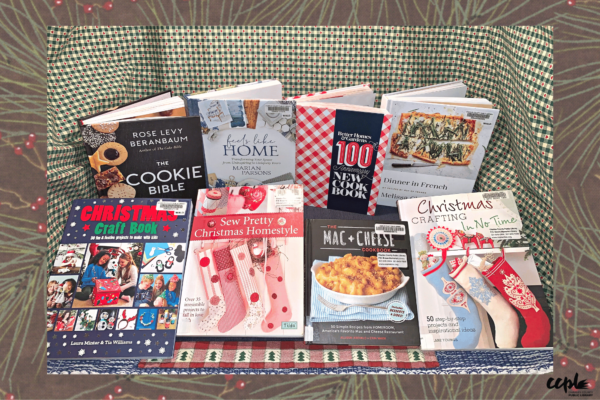
You may also check out our CCPL catalog for more information on recipes for delectable, satisfying winter meals, beautiful craft projects, and tips for creating a festive and inviting home, such as:
- Country Farmhouse by Cindy Smith Cooper
- Welcome Home: A Cozy Minimalist Guide to Decorating and Hosting All Year Round by Myquillyn Smith
- Christmas at Home: Holiday Decorating, Crafts, Recipes by Country Living Magazine
- Dinner in One: Exceptional & Easy One-Pan Meals by Melissa Clark
- Wreaths: 22 Festive Creations To Make by Sian Hamilton and Tansy Wilson
- Homemade Holiday: Craft Your Way Through More Than 40 Festive Projects by Sophie Pester & Catharina Bruns
- The Cookie Bible by Rose Levy Beranbaum
- Feels Like Home: Transforming Your Space from Uninspiring to Uniquely Yours by Marian Parsons
- Better Homes & Gardens 100th Anniversary New Cookbook by Better Homes & Gardens
- Dinner in French: My Recipes By Way of France by Melissa Clark
- The Christmas Craft Book: 30 Fun & Festive Projects to Make with Kids by Laura Minter & Tia Williams
- Sew Pretty Christmas Homestyle: Over 35 Irresistible Projects to Fall in Love With by David & Charles Publishing
- The Mac + Cheese Cookbook: 50 Simple Recipes from Homeroom, America’s Favorite Mac and Cheese Restaurant by Allison Arevalo and Erin Wade
- Christmas Crafting In No Time: 50 Step-by-Step Projects and Inspirational Ideas by Clare Youngs
- Delish Kids: (Super-Awesome, Crazy-Fun, Best-Ever) Cookbook by Joanna Saltz & the Editors of Delish
- Totally Kosher: Tradition with a Twist! 150+ Recipes for the Holidays and Every Day by Chanie Apfelbaum
- Super Salads: 70 Fresh and Simple Recipes by Good Housekeeping
- Around the Board: Boards, Platters and Plates: Seasonal Cheese & Charcuterie Boards for Year-Round Celebrations & Elevated Gatherings by Emily Delaney
- The Christmas Season: Created by Scandinavian Artists by Katrine Martensen-Larsen
- My Hygge Home: How to Make Home Your Happy Place by Meik Wiking
- Vegan Holiday Feasts: Inspired Meat-Free Recipes for the Holiday Season by Jackie Kearney
- Wild + Free Holidays: 35 Festive Family Activities to Make the Season Bright by Ainsley Arment
- A Dish for All Seasons: 125+ Recipe Variations for Delicious Meals All Year Round by Kathryn Pauline
- The Complete Autumn & Winter Cookbook: 550+ Recipes for Warming Dinners, Holiday Roasts, Seasonal Desserts, Breads, Food Gifts and More by America’s Test Kitchen


